WeTools
Turn a PNG into the picture the engine draws.
WeTools comes with the editor. A PNG stays a PNG until WeTools writes a .wei. That file is what Import → Image brings into the project.
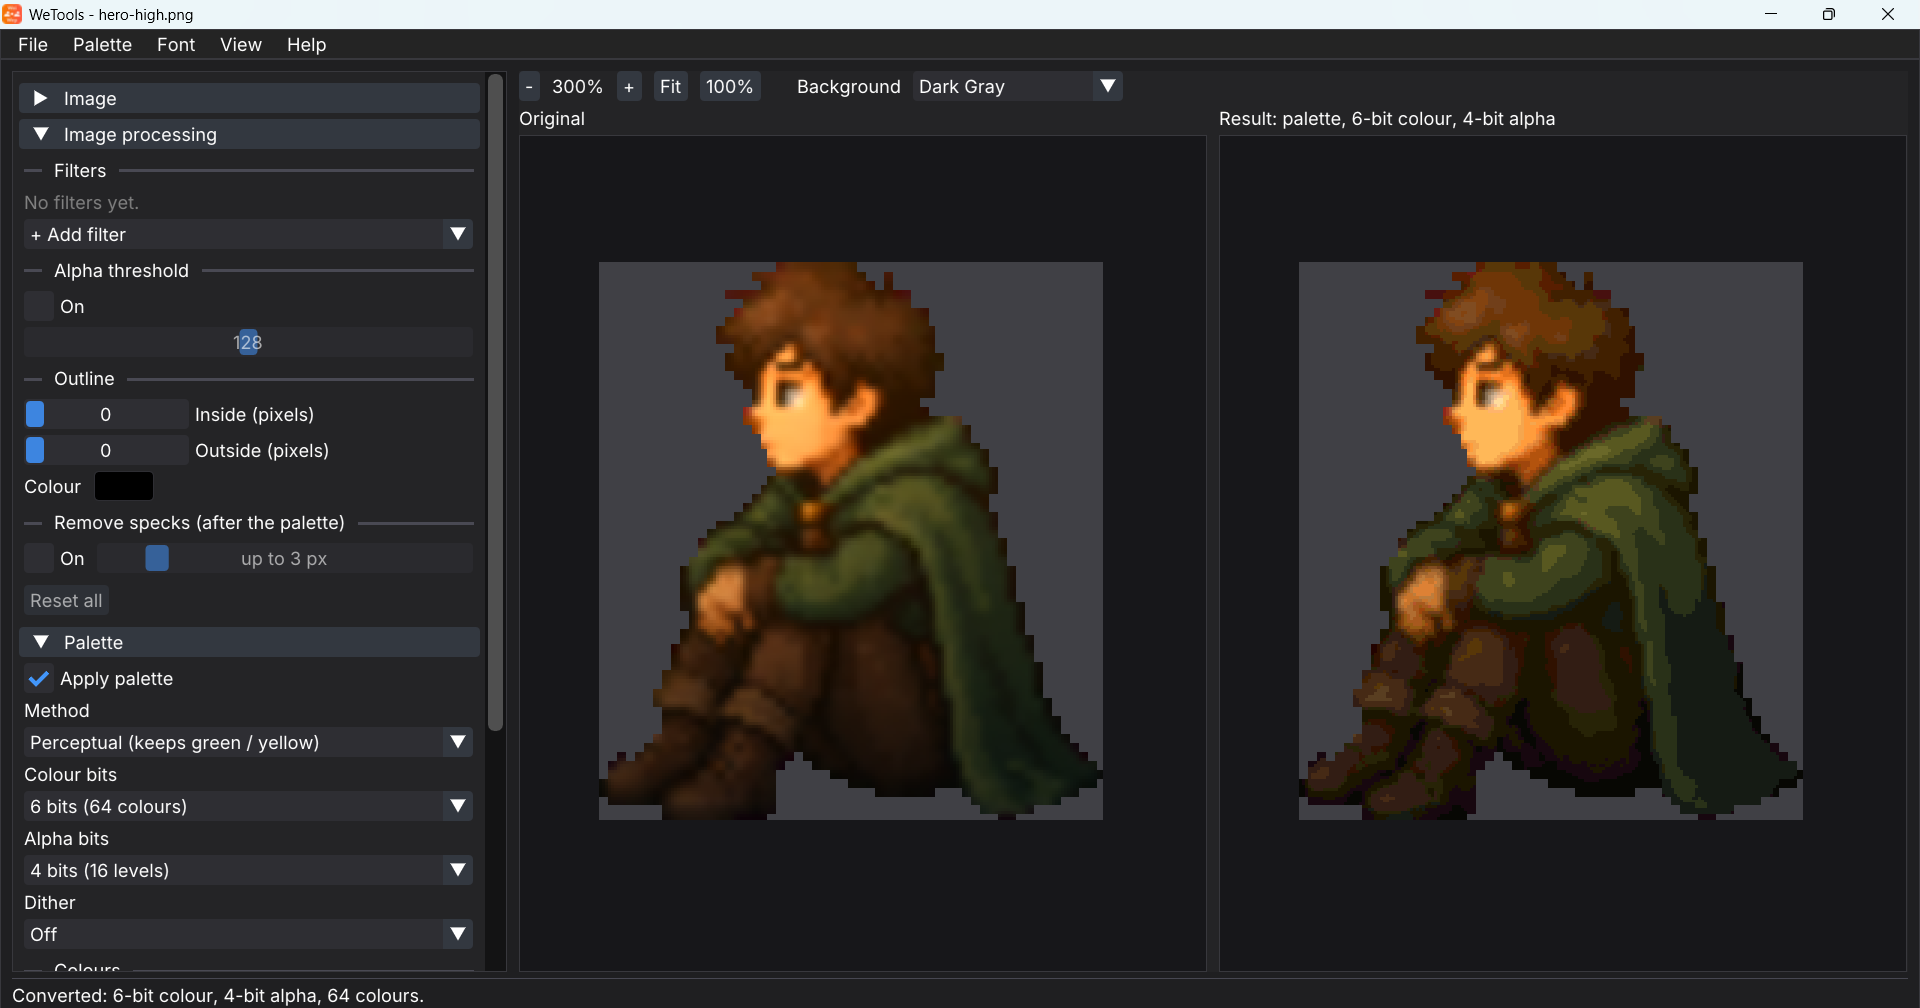
1. Open the picture
- Open WeTools from its shortcut.
- File → Open... (Ctrl+O) and pick a PNG.
The left view is Original. The right view is Result. A picture opens with Apply palette off, so the Result is still full color. The status line says to turn Apply palette on when you want to see the colors reduced. Use that moment to judge the picture before the palette.
Help → WeTools Help (F1) opens the same notes inside the tool.
2. Turn on Apply palette
- In the Palette section, check Apply palette.
- The Result switches to the reduced palette. Change a setting and the Result updates at once.
Apply palette only changes what you see. File → Save .wei always writes the palette settings, even when Apply palette is off. Turn it on before you save, so the file matches the Result you approved.
3. Choose how the colors are picked
Method is how WeTools chooses the colors when the PNG has more than the palette can hold. A painted picture can start around 9,000 colors. The palette holds 64 or 32.
- Perceptual (keeps green / yellow) — keeps colors that stand out, such as an isolated green or yellow. A good first choice for a character or a scene.
- Median Cut (balanced boxes) — splits the colors into balanced groups.
- Popularity (dominant colours) — keeps the colors that cover the most pixels.
- K-means (best match) — groups similar colors and picks the closest match. It takes longer and is the one to try when the others look wrong.
Switch the method with Apply palette on and compare the Result. The Original stays put, so you can see what changed.
4. Set how many colors
Colour bits is the size of the palette:
- 6 bits (64 colours) — the usual size for one picture.
- 5 bits (32 colours) — a smaller palette, when the picture can live with fewer.
- 8 bits (256 colours) — the most a picture can hold.
Alpha bits is the transparency of that same picture:
- 0 bits (opaque) — no transparency.
- 1 bit (on / off) — a pixel is solid or gone. Use this for a hard pixel edge.
- 4 bits (16 levels) — a soft edge or a fade. More bits means more levels.
5. Choose dither
Dither is how a shade that did not fit the palette is drawn.
- Off — each area stays one flat color. Use this for pixel art with flat fills.
- Ordered (pixel-art pattern) — a soft shade stays as a pattern of pixels.
- Error diffusion (smooth gradients) — a glow or a sky stays smooth, mixed from two palette colors.
6. Save the picture
- File → Save .wei... (Ctrl+S).
- Pick a name and a folder. This file is the one the editor imports.
The status line reports the bits and the color count, such as “Converted: 6-bit colour, 4-bit alpha, 64 colours.”
When you want the palette as its own file, use Palette → Save Palette (.wep)... A .wep is optional. The .wei already carries the colors it draws with. Palette → Load Palette (.wep)... applies a palette you saved earlier, and turns Apply palette on.
File → Save PNG... writes what the .wei looks like, as a PNG you can open elsewhere. The engine still wants the .wei.
7. Import it
- Open the project in the editor.
- Import → Image (.wei)... and pick the file.
- It is copied to
Assets/Images.
A palette file uses Import → Palette (.wep)... and lands in Assets/Palettes.
To draw it, follow Getting started from “Make a sprite”: right-click the image, Create Sprite..., then put that sprite on an object. A sheet of frames continues in Sheets and animation.
A folder of pictures
File → Batch Convert... runs the same palette settings on every picture in a folder. Set the method, the bits, and dither first, then convert. Each file becomes a .wei. Import those one by one, or keep them and import as you need them.
Tools you can ignore on a first picture
Image processing runs before the palette. Filters, an outline, and an alpha threshold are there when a PNG needs them. Remove specks waits until Apply palette is on, and it stays off while dither is on, because it would undo the dither. Palette → Palette Editor... edits the colors themselves. Font → Create Font... builds a pixel font (.wfnt) from a picture of glyphs.
Next: Scenes.